


How to Hike the Bright Angel Point in North Rim
Introduction The Bright Angel Point hike is one of the most popular and accessible trails on the North Rim of the Grand Canyon National Park. Known for its stunning panoramic views and relatively short distance, this trail offers hikers a unique opportunity to experience the awe-inspiring beauty of the canyon’s northern edge. Whether you are an experienced hiker or a casual visitor, learning how t
Introduction
The Bright Angel Point hike is one of the most popular and accessible trails on the North Rim of the Grand Canyon National Park. Known for its stunning panoramic views and relatively short distance, this trail offers hikers a unique opportunity to experience the awe-inspiring beauty of the canyons northern edge. Whether you are an experienced hiker or a casual visitor, learning how to hike the Bright Angel Point trail properly will enhance your experience, ensure your safety, and allow you to fully appreciate the natural wonders of this iconic landscape.
In this comprehensive tutorial, we will walk you through everything you need to know about hiking the Bright Angel Point trailfrom preparation to execution, best practices, essential tools, and real-world examples. By the end, you'll be fully equipped to enjoy a memorable and safe hiking adventure on the North Rim.
Step-by-Step Guide
1. Planning Your Hike
Before setting out, its crucial to plan your visit carefully. The Bright Angel Point trail is open year-round, but weather conditions vary significantly between seasons. Summer brings warmer temperatures, while winter can introduce snow and ice.
Key considerations for planning:
- Check the weather forecast for the North Rim area.
- Visit the official Grand Canyon National Park website for trail conditions and alerts.
- Determine the best time of day to hikeearly morning or late afternoon are ideal for avoiding the midday heat and crowds.
- Ensure you have adequate time to complete the round-trip hike, typically 1 to 2 hours depending on your pace.
2. Preparing Your Gear
Due to the trails relatively short length (approximately 0.6 miles round-trip), packing light is advisable. However, certain essentials remain necessary for comfort and safety.
Essentials to bring:
- Sturdy, comfortable hiking shoes or boots with good traction.
- Sun protection: hat, sunglasses, and sunscreen.
- Water: at least one liter per person to stay hydrated.
- Layered clothing to accommodate temperature changes.
- Camera or smartphone for capturing vistas.
- Trail map or GPS device (optional but helpful).
3. Arriving at the Trailhead
The Bright Angel Point trailhead is located near the North Rim Visitor Center. Upon arrival:
- Park in designated parking areas.
- Check the visitor center for the latest trail information.
- Use restroom facilities before you start.
4. Starting the Hike
The trail begins as a paved path that gradually ascends to a viewpoint overlooking the canyon. Follow marked signs and stay on the designated trail to minimize environmental impact and for your safety. The trail is relatively easy but can be steep in spots.
5. Enjoying the Viewpoints
Bright Angel Point offers spectacular views of the canyons layered rock formations and the Colorado River far below. Take your time to absorb the scenery, snap photos, and rest as needed. Benches and viewpoints are available for breaks.
6. Returning Safely
Retrace your steps back to the trailhead. Be mindful of footing, especially if the trail is wet or icy. Maintain hydration and pace yourself. Avoid distractions such as phones when walking to prevent tripping or falling.
Best Practices
Respect the Environment
Bright Angel Point is part of a fragile ecosystem. To preserve its beauty:
- Stay on marked trails to avoid disturbing vegetation.
- Do not litterpack out all trash.
- Leave wildlife undisturbed and observe from a distance.
Safety Tips
Even though the hike is short, safety is paramount:
- Hike with a companion if possible.
- Inform someone of your hiking plan and expected return time.
- Carry a small first aid kit.
- Be cautious near cliff edgesthere are no guardrails in some areas.
- Watch for sudden weather changes, especially in winter.
Timing and Crowd Management
The trail can get busy during peak seasons. To avoid crowds:
- Start early in the morning or later in the afternoon.
- Visit during weekdays if possible.
- Consider less busy months like late spring or early fall.
Tools and Resources
Maps and Navigation
Although the trail is well-marked, having a map can enhance your experience:
- Official Grand Canyon National Park maps (available at visitor centers or online).
- GPS-enabled hiking apps (such as AllTrails or Gaia GPS).
Weather and Trail Conditions
Reliable sources for up-to-date trail and weather information include:
- National Weather Service website for the North Rim area.
- Grand Canyon National Park official website for trail conditions and alerts.
Photography Equipment
To capture the breathtaking views, consider:
- A camera with a wide-angle lens.
- A tripod for stability during low-light conditions.
- Extra batteries or portable charging devices.
Real Examples
Example 1: Morning Hike with Family
Jane and her family visited the North Rim in early October. They started their Bright Angel Point hike at 7:30 AM to avoid crowds and the midday sun. Wearing layered clothing and carrying water, they took their time enjoying the views and spotting wildlife. The hike took them about 1.5 hours round-trip, and they ended the day with a picnic near the visitor center.
Example 2: Solo Photographers Adventure
Mark, a professional photographer, chose to hike Bright Angel Point during the golden hour just before sunset. Equipped with a DSLR camera and tripod, he captured stunning images of the canyons vibrant colors. Mark utilized a GPS app to track his location and made sure to return before dark. His photos were later featured in a travel magazine.
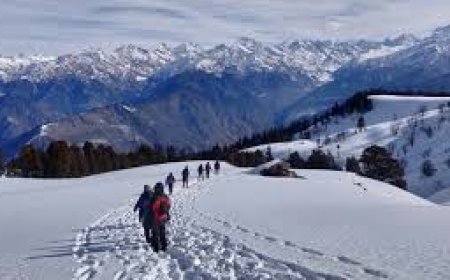
Example 3: Winter Hike with Precautions
Lisa planned a winter hike on the Bright Angel Point trail. She wore insulated boots with good traction and carried trekking poles for stability on icy patches. Checking the weather beforehand helped her avoid a snowstorm. Although the trail was quieter, she took extra caution near the edges and completed the hike safely.
FAQs
How long does the Bright Angel Point hike take?
The hike is approximately 0.6 miles round-trip and typically takes 1 to 2 hours depending on your pace and time spent at viewpoints.
Is the Bright Angel Point trail suitable for beginners?
Yes, the trail is relatively short and accessible, making it suitable for beginners and families. However, some sections have steep drops, so caution is advised.
Are pets allowed on the Bright Angel Point trail?
Pets are generally not permitted on the North Rim trails, including Bright Angel Point, to protect wildlife and ensure visitor safety.
Is there an entrance fee to access the North Rim and the Bright Angel Point trail?
Yes, the Grand Canyon National Park charges an entrance fee, which covers access to both rims and all trails within the park.
Can I hike Bright Angel Point in winter?
Yes, the trail is open year-round, but winter conditions can be challenging. Proper gear and caution are essential when hiking in colder months.
Conclusion
Hiking the Bright Angel Point trail on the North Rim of the Grand Canyon is a rewarding experience that offers breathtaking views and a chance to connect with one of the world's most iconic natural wonders. By planning carefully, following best practices, and using the right tools, you can enjoy a safe and memorable hike regardless of your experience level. Whether youre visiting with family, exploring solo, or capturing photographs, the Bright Angel Point trail is an accessible gateway to the grandeur of the Grand Canyons northern edge.
Equip yourself with knowledge, respect the environment, and take your time to savor every moment of this incredible journey.